20 December 2018

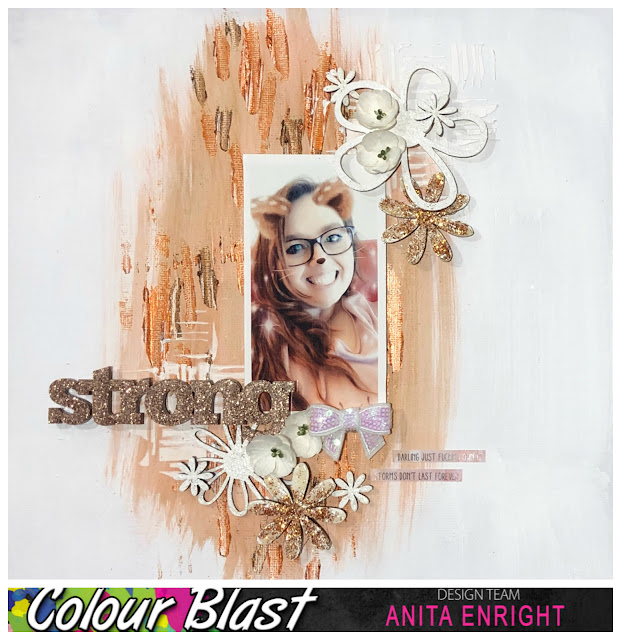
"STRONG" | Colour Blast


Hi Everyone

Now I love my Colour Blast products as much as you and with the large number of products in my collection I have been trying to use different colours on each of my posts.
Today I have used two of my all time favourite Colour Paste in Sienna and Leather. They are both extremely striking on the white background.  
So after using a fun filter from Snapchat I ended up with the perfect photo for my layout. It's nice to play around once in a while.
 After preparing my cardstock background with some Heavy White Gesso, using a baby wipe and two coordinating Colour Artist Inks in Rust and Cider I smooshed the Rust across the background and once dried added Cider.

I did this a couple of times to get the depth and colours that I wanted to tie in with the photo.
  
Next, using my metal spatula I stroked some of the Colour Paste
in Sienna and Leather down my page.  I wanted a very uneven look on the page.

Using the amazing Heavy White Gesso
I added more texture with a stencil ensuring some of the stencilling went over the Colour Paste

After selecting my chosen embellishments I decided I wanted to keep the vast majority of them white.  I found a heap of wood veneer flowers in my stash.  I 'attacked' them with my sponge and Heavy White Gesso trying to get a a bit of a stippled and roughish look to them.


I didn't quite the look I wanted, so I worked with a paint brush and the gesso and ended up happy with the final result.
  Using the Colour Shimmer Brush Marker in Clear I added a slight bling to the wood flowers.  It ended up ever so subtle but took the matte affect off them. I did up adding some copper glitter to two of the flowers that you can see in the close up photos below.


 I added by bling title, a couple of mulberry paper flowers and a few sticker phrases from Flutterby Designs and a cute sequin bow from D-lish Scraps and the layout was complete.


Thanks for stopping by.


Anita E
xx 


6 December 2018

"Ellie" | Colour Blast


Happy Thursday Everyone

With Christmas just around the corner I am glad you dropped in to the blog today to check out my latest creation.

We adopted the most beautifully natured rescue puppy earlier this year after our 14 year old boy.  My other fur child Molly was depressed at his death and was very lonely so Miss Ellie came along at just the perfect time...... and even though they are both girls it was love at first sight for them.   

Just the one photo shows just how photogenic she is with her big bunny rabbit.


For this layout I decided to use my Colour Shimmer Dusts in Candy and Peacock on watercolour paper.  Firstly on my mixing mat I added the Colour Shimmer Dust to some water.

After spraying the watercolour paper I then dipped my brush in the mixed up Colour Shimmer Dusts and lightly dabbed my brush on to the wet watercoLour paper. I tried it first on a small piece and I loved how the colours were so rich so I have kept the small piece to use at a later date on a card.

Below is how my finish A4 piece of watercolour paper turned out.
I looked amazing. 

Once dry I then tore the watercolour paper and adhered it to my page base card. By doing my watercolouring this way I also had the control of where it went on my layout rather than leaving it to chance which is my normal result with mixed media products.

Some of us 'Colour Blasters' have the amazing Shimmer Cubes in their stash and until they run out I continue to use them on many of my projects to colour items.  For this layout I used the cube to colour some wood veneer pawprints from Corbett Creations and some letter to create Ellie's name.


And here are a couple of closeups of my finished layout.


Thanks for stopping by.
With Christmas coming in a couple of weeks how many presents are you making?

Until next time...

 Anita E
xx

22 November 2018

Fun in the Sun | Colour Blast


Hey Everyone

Welcome to my new November post for Colour Blast.  I can't believe in a few short weeks it will be Christmas 2018.  Where on earth has this last year gone.  CRAZY!!!


My brother recently sent me some photos of his families recent trip to Cable Beach in WA during the last kids school holidays.  I really love this photo of my two nieces and loved the colour combination and knew I just wanted to replicate it in a scrapbooking page.


To create my background I used the Colour Shimmer Dusts in Peacock, Sunflower and Amber.
I prepped my white cardstock with Heavy White Gesso. 
(I forgot to take a picture of the cardstock with all colours)


 Next I mixed Colour Paste in Tangerine Dream and Sunflower together to create marbled effect and then applied it through a stencil over the orange part of the background to create a look like rocks to match the background of the photo.


I used a lot of a D-lish Scraps Just Add Paper kit on this layout.  I used the Colour Embossing Powder in Sunshine for my sun and in Deep Water and Envy on the title.

I then constructed the layout with flowers, die cuts and embellishments. Check out a couple of close-ups.  


Thanks for stopping by today.

Anita
xx

10 November 2018

Chase your Dreams | Colour Blast DT post


I love the colours of summer time so I wanted to play with these bright citrus colours and create a happy layout.  My niece was only little at our wedding but my girlfriend captured her 'cuteness' in this photo and I needed to scrap it.  It might be 10 years later, but I think it has come up beautifully using the Colour Blast products.

For the layout I only used two products, the gorgeous Colour Artist Inks and Colour Shimmer Dust.

To start I stamped a heaps of floral images using Stazon black ink so I knew the outlines would not smudge when I used the Colour Artist Inks over it. My chosen colours were Lime, Mermaid, Citrus, Barley, Cider, Slipper, Grass, Bordeaux and Oasis. Using a blender pen I coloured in all the flowers, some with mottled colours some with solid colours. I was lucky to have a punch that matched the stamped images so it was quick and easy to punch them out.

 I love my greens so next I took the Colour Shimmer Dust in Lush and sprinkled it across my white cardstock and then sprayed it with a white pearlised spray.

 Next I  painted my chipboard with the Heavy White Gesso

Once dry I then used the Colour Artist Inks again to colour the title using the colours of Slipper and Grass.  As each layer of colour dried, I added another layer to build on the colour.
 There are so many layers on my page but I think it turned out great.  Below are some close ups of it. I had to add one of the gorgeous Charms Creations hearts and some little goodies from D-lish Scraps to finish the page.


 Thanks for stopping by.
I hope to see you back soon.

Anita
xx


29 October 2018

"Never Stop Dreaming" | Colour Blast


Welcome Back

For my share today I created a Dream Catcher canvas wall hanging.   I love having some of my creations hanging on my craftroom walls and since  need to use up my stash (to make room for more) I went for this canvas as my project base.


To start my project, using some plain white tissue paper and a really good gel medium I attached the tissue to the canvas base.
  
Once dry I did several coats of Heavy White Gesso to seal it and give it a great working surface.

I then chose an array of Colour Shimmer Sprays including Sunshine, Tangereen Dream, Apple of My Eye, Deep Water, Lovely Lilac and Envy and went crazy. As much as I liked the background there was too much colour and a little too much shimmer.  
To fix this I went back over the top of the colour with the Heavy White Gesso again so soften the background and I was happy with the end result. I forgot to take a second photo after the second coat.


 Next I got to add my favourite Colour Shimmer Dust in Lollipop and really hit with the water spray so that the colour got in to all the creases of the tissue paper.

I then worked on my embellishments.  I love the Celebr8 chipboard and adore the feather piece.  I firstly gave it a coating of Heavy White Gesso and then with a sponge and Colour Artist Ink in Slipper. I allowed each coating to dry but I just couldn't get the colour I wanted.... maybe I was too impatient to build it up.


So I quickened up the process and added some of the Colour Artist Ink in Slipper to some Heavy White Gesso and mixed it up in my pallet.  I made sure when I mixed it that it had a marbled effect so hopefully it would transfer like an ombre effect when it dried. 


I then mixed my Colour Artist Inks in Oasis and Mermaid together to make a more jade colour and then painted it on to some feather I made using a silicone mold.  They came up a great.


 Using the Colour Embossing Powder in Deep Water and Rose Petal and embossed a wood veneer wreath with a marbled effect. I then used the Deep Water Colour Embossing Powder again and heat embossed my title.


Using an array of Little Birdie Crafts flowers, a bit of bling and all the other embellishments that I altered using Colour Blast products I completed the canvas. 

Below are a full picture of my finish canvas and several closeups.


Thanks for stopping by. 
Until next time... happy crafting.

Anita E
xx